Tuesday, February 25, 2014

OS X Mavericks Update and Security Fixes

apple-logo

I recently wrote about the major security whole in the latest version of OS X – read my last post. It appears Apple has released the fix finally. Although the ‘fix’ comes not in a simple ‘patch’ but in an entire Operating System upgrade!

After several months of testing, Apple has released OS X version 10.9.2. The MAJOR (and very dangerous) SSL bug isn't mentioned in the release notes that appear in Software Update, but the bug is mentioned on Apple's security page for the update. Seems Apple is being their usual shity selves when it comes to security - hide or lie about it, sort of hiding the fact that this is so important.

To be a 'little' fair, this update does add some features but over all is really a bug fix of many major issues with the new Operating System. In Windows terms it would be called a full Service Pack.

As with any large Operating System upgrade/update you should of course back up your system – Use Time Machine or any other method I’ve described in previous posts.

Run the Software Update to update your system to 10.9.2 and if any other software shows updates available, select them too. If you’d like you can grab the full Combo update here.

If you have Mountain Lion it too has an update available - run Software Update to get it.

Please make sure if you run an Apple desktop or laptop computer that you update as soon as possible.

Be safe, Peace.

Sunday, February 23, 2014

Serious OS-X and iOS Security Vulnerability Completely Opens Up Your ALL Your Secure Communications

Rotten_plus_GreenApple

It had been know for MONTHS that there was a serious security flaw in iOS and possibly the latest version of OS X that could allow attackers to surreptitiously circumvent the most prevalent Internet security protocol – TLS/SSL and and Security Certificate validations. The issue is a "fundamental bug in Apple's SSL implementation," This can allow attackers to view ANY of your ‘secure’ Web communications. This includes e-mail, banking sites. Facebook etc..

Apple finally released an ‘emergency patch’ to the latest version of iOS last week, but it appears that the flaw affects more than just Apple’s mobile platforms. It actually affects the latest versions of OS X – Apples latest desktop Operating System too!!

If you have an iDevice I’d recommend backing it up; via iTunes or any of the other methods I’ve previously recommended. Then checking for any System Updates. Tap Settings > General > Software Update. Then download and Install to download the update. [Updates might download automatically while your device is connected to Wi-Fi and a power source.]

As for you Desktop computer, well there lies the rub. Apple appears to have at first done the usual – deny, then downplay, then finally admit there is a serious problem and ‘promise a quick fix/patch’. [It’s really crazy that they are able to get away with this so often; I guess those reporting are too busy licking Apple sack….but I digress]

So what to do..

If you use the Desktop Apple Operating System – OS X you should always use the latest versions of Chrome or Firefox for internet browsing to help mitigate some of the possible exposure. [I NEVER use Safari and always recommend to all my clients that they don’t either]. Even if you’ve take the latest update on your iDevice I’d still recommend I’d recommend Chrome for iOS.

Here one of the latest articles I’ve found with a VERY good explanation. You should at least read this! But I’d recommend hitting all my sources.

Be safe folks!

Sources to read 1, 2, 3

Saturday, January 18, 2014

BlackPOS breach

So here is a story about the recent MASSIVE thefts at Target Neiman Marcus and other retailers.

What is by far the most scary is this line,
"…said it was possible for Target and Neiman Marcus to be hacked after the software tried several easy passwords to remotely hack the stores' registers, and added that the malware, called BlackPOS.."

We are finding out the breach occurred because of poor Security practices! Easy or standard passwords at the gates!

This is totally unacceptable and, in my opinion, everyone involved from the top to bottom of these IT chains should be fired and also be part of any litigation directed at the companies.

You know you hear it from me and just about everyone else: use complex Usernames and especially passwords. NEVER use a default username or password. Never use the same password for different accounts.

So I'll say this again to everyone. Please change your passwords to something complex (that includes Upper and lower case letters, numbers AND symbols) and do NOT use that same password for different accounts.

Well that is all. Peace out.

Monday, October 7, 2013

Adobe Hacked (again)

Yay another security hack. :(

If you have an Adobe Account Please login to their site and change your Password. You may have already received notice to reset them, if so please do!

I'd suggest if you have any payment information associated with any Adobe account/login you remove it! You can read from Adobe about it here.  And some more (and scarier) details from some other tech sites like this one  or this one.

Sunday, June 16, 2013

Using Google’s Two Step Verification

If you don't know what 2-Step Verification is here is a simple explanation: The two-step system uses both a password and a numerical code tied to your mobile phone, which can be sent by Google via SMS or generated by a smartphone app. Either way, it means a prospective hacker would need to obtain both your password and your phone to access your account.

I’ve been aware of Google’s two-step verification system for some time, but I felt my very strong password, the fact that I don’t use that password anywhere else and that it could not be ascertained by usual social engineering methods, was more than adequate protection. I was also concerned the system might be a hassle to use since I routinely sign in from so many different computers and locations. I already do use a password manager (KeePass) that requires not only a master password but I also use a key file too. [There are other very effective password managers out there I suggest you use one. Ars has a good article about that here.]
But with the massive increase in hacking and high jacking of information and the advancement of brute force cracking technologies and techniques I felt it was time to get onto the 2-step wagon.

Also I suggest that if you use Yahoo mail for anything you migrate towards Gmail or some other ISP. Yahoo has one of the worst records for email security. They are  hacked all the time! One recent article is here.
And for petesake please do NOT 'link' your Facebook account with Yahoo - that too is a major source of hacked Facebook account activity. If you currently have it linked I suggest you separate it. You can read how here and here.

So here is a brief explanation of how to enable 2-step verification. I will also link to some other resources on how to enable and use it at the bottom. If you find this too complicated or too much of a hassle you can always disable it very easily.

So let’s get started. Login to your account and go to Account then. Security

image

In the Security list you’ll see 2-step verification. This is where you can ‘turn it on’ and edit the settings.

image

Printable backup codes. Warning: If your phone is unavailable, these codes will be the only way to sign in to your account. Keep them someplace accessible, like your wallet, desk drawer or other safe place. Printable backup codes.

image

Here click on ‘Show backup Codes’

image

I printed out a set and put them someplace safe. I also saved them to a text file and imported and copied that text file of codes into my Password management application – KeePass.

If you click on the Application Specific Passwords you can create them for you other applications like Outlook, iMail, ThunderBird etc. Just give it some useful name, click on ‘Generate Password’ and then make sure to copy (or right down) that password – it is only shown once! I just copied each one to a text file so I could then paste them into the proper field (password) on my Outlook/configuration setups.

image

Some other links and info.

Here's Google's info page. And more here.

Setting up Mac Mail.

Setting up Outlook.

One more thing to consider if you’re a paranoid guy like me. I have all my browsers set to delete Internet history, cache and cookies when I close my Browsers AND I also run CCleaner many times a day to clean out temp files. Doing this will clear out the 2-Step ‘security token’ so you must manually enter some specific cookies to NOT be deleted in your browser and/or CCleaner.

To create ‘safe cookies’ in Firefox here is a good article. For Chrome go here and read the ‘Make exceptions for cookies for specific websites. The method is just about the same for InternetExplorer and Safari.

For CCleaner you can add the cookies to keep manually. Read here.

The actual cookie names you need to keep are here:

accounts.google.com
accounts.youtube.com
google.com
mail.google.com
apis.google.com
0.docs.google.com
docs.google.com

Hope this helps some. Peace out.

Saturday, May 11, 2013

Windows 8.1 news

If you are buying a new PC or laptop and you’ve been holding off because of the new Metro interface you might be in luck.

It looks like Microsoft is pulling a 'New Coke' here and admitting that the 'Metro' desktop and lack of 'Start' button was a VERY BAD MOVE. Especially for those in the business community.

I got this deal earlier this year and it's still a great one. For those looking for a powerful Windows PC laptop that could easily replace an older high end workstation this is a pretty good choice.
I wrote an article about my original selection, purchasing and finally, my adventures in 'downgrading' it to Widows 7 Pro/Enterprise here. Many of the things I do with my system cannot be done efficiently, or at all, from the silly ‘Metro’ interface. And other applications simply wouldn’t run properly.

With Windows 8.1 (which it will release mid to late summer, it is said that Microsoft is going to bring back the traditional 'Boot to Desktop' feature along with the much missed 'Start Button'. It looks like the start button will most likely look like the 'Windows Charm' in Windows 8.1 but it hopefully will be there. You can read about that here and here.

IF you are stuck with Window 8, don’t want to go through the hassle of downgrading it, and can't wait for Microsoft to ‘fix it’, there is a fantastic solution to bring back the old Window 7 interface. It's called Start 8 by Stardock Software It's a great app and only costs $4.99 USD. It's the first thing I install on clients Windows 8 machines when they tell me they can't handle the Windows 8 Metro interface.

Peace, and be safe.

Monday, February 11, 2013

Add Gmail Contacts to iOS 5

Though many don’t realize it the process for importing your contacts to your iPhone from Gmail Address Book is quite simple. Getting them OUT of your iPhone can, depending on how their configured, be much more complicated. But that is for another post. I know that many supposed Mac techs and BigBox retailers will want to charge you plenty for this simple procedure, please don’t let them.

So here we are going to assume that your entire address book is connected to your Gmail account. To import/sync them we are going to use iPhone’s Microsoft Exchange configuration. So let’s go:

  • On your iPhone or iPad, open the Settings app.
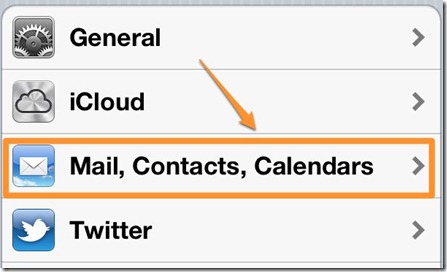
  • Scroll down to Mail, Contacts, Calendars and select it.

    Mail-Settings-iPhone

  • Next, add a new account
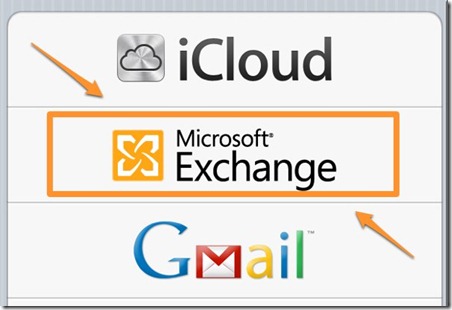
  • At the add account screen you’re going to want to select the Microsoft Exchange option. This is how we are going to import your Gmail contacts.

    Exchange-Gmail-Contacts

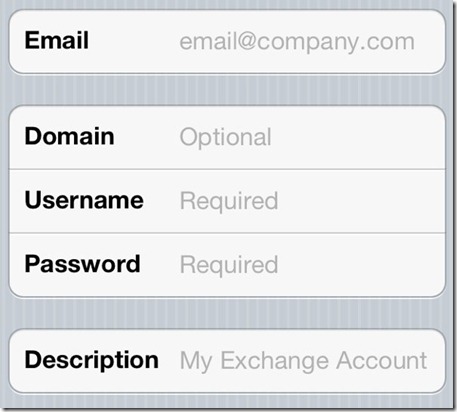
  • Enter your Gmail address in the email field. Leave the Domain field as “Optional” and fill in your Gmail username (without the @gmail.com) and your password. You can leave the description but remember it so you know what it is later.

    Form

  • Click next, the form will update and now include a Server field. In the server field enter m.google.com. Click Next or Done.

    server-gmail-iphone

  • It will confirm that you want to sync your mail, contacts, and calendars. Slide these to On for Contacts and Off for the others.  Here we were only concerned with Contacts, BUT you can also synchronize your mail and Calendar too!

    Happy computing!


    Edit: after doing this many times for clients and others I’ve found a guy who created a great video on the above steps! You can watch that here:

    Sync Gmail Contacts to iPhone
  • Sunday, February 10, 2013

    Critical February Security Patches

    Microsoft's Patch Tuesday is next week. And it's going to be VERY important

    Microsoft's security patches are due to be released at 1:00pm EST on Tuesday 12th February. [Read more here from MS  ]

    The longer you take to update the security patches on your computer, the greater potential risk you could find yourself in!!

    In all, 57 separate security flaws are waiting to be fixed.

    According to Microsoft, every single version of Internet Explorer - from version 6 to version 10 - needs to be patched, as they are vulnerable to exploitation by drive-by attacks.

    That means that simply visiting a booby-trapped webpage could silently infect your computer with malware - hijacking your PC for a hacker's own ends.

    According to an advisory from the software giant, five of the 12 security updates have been given Microsoft's highest severity rating of "critical".

    Also note that Adobe has again released critical security patches to it's Flash Player software. [read here]

    Even if you are not on a Windows/Microsoft Operating System you should still make sure your Adobe Flash, Adobe Shockwave  and Oracle's Java software  and Browser Plug-ins are up to date!

    Be safe out there! MMm K.

    Wednesday, January 30, 2013

    Disable UPnP to Protect Yourself from New Security Hole Found in Wi-Fi Routers.

    If you don't know. And most of you probably don't. There is a major security flaw that has been recently aggressively exploited. It could allow people with malicious intent access your system(s). Mac, Windows PC and Linux, all are vulnerable because this is NOT a OS flaw, but a router flaw! So please don’t think you are safe just because you by into the belief (very wrong by the way) that ‘your’ type of Operating System ‘doesn’t get infected…’.  Scans from security companies have shown about 50 MILLION vulnerable access points already.

    It is strongly suggest that end users, companies, and ISPs take immediate action to identify and disable any internet-exposed UPnP endpoints in their environments.
    UPnP is pervasive - it is enabled by default on many home gateways, nearly all network printers, and devices ranging from IP cameras to network storage servers.

    Rapid7.com has an online tool here  that can check the external interface of your router and let you know if you are vulnerable.

    To fix/resolve this issue all you need to disable UPnP on your wireless router.
    Since each router is different, you’ll need to login to your wireless router’s admin panel (use the manual to figure that out), and then find the UPnP setting. This may require someone with more skills (like your teenager) or an IT professional (preferred method) to turn this off for you you. But however you do it, please do it.

    Be safe. Smile

    Tuesday, January 1, 2013

    Tech power and input deals.

    For those with laptop/portable computers you know what it's like to always have to pack everything in your bag for each trip.

    Why not keep have an extra power supply so that you can have one at home AND the office (or in your bag) always waiting? No constantly having to reach and dig behind the desk to unplug the power supply. And then do the same when you get to the office.

    Here is a super solution. And right now this is on sale for only $19.99 w/free shipping at Newegg.com.
    Rosewill RMNA-11001 Universal automatic Notebook Power Adapter 90W
    http://bit.ly/KSUOpD

    And while your at it how about an additional mouse? I use this one on PCs and Macs. Works great. I have a few of these too – home, office and travel bag.
    http://bit.ly/UBT2ib

    Just thought I'd pass this on.

    Sunday, December 30, 2012

    Moving Virtual Machines in ESXi from older hardware to new server.

    If you have outgrown you current ESXi hardware and need to move to another physical machine and you don’t have vSphere you can still easily move all your VMs to the new server. Without additional software costs.

    First install the ESXi Host software on the machine and configure it for access via the management console.

    Take note of the IP address and credentials you used for you new installation.

    Then login to your existing VMware installation via your management computer/console. And you can then do one of the following.

    Simple way?

    Use the outstanding free product(s) by VEEAM!
    Veeam Backup Free Edition. The free version that will let you backup, replicate/move and restore entire machines from one ESX server to another on the same subnet. The free version limits the backup/migrate tasks to one machine at a time but it works! If you have a VMware environment I highly recommend their product(s) for backup and disaster recovery. You can automate just about everything you need for backing up and restoration. Check out more here http://www.veeam.com .

    Older not so quick but still simple old fashioned way.

    Open the management console. Connect to the original server/Host. Navigate to the Server (vCenter) containing the VMs you wish to move.
    Commit any snapshots in the VM you are going to move.
    Power off the VM.
    Click the Configuration tab.
    Click Storage.
    Open/Browser to the Datastore where the VMs are located and find the folder containing the entire Virtual Machine (the one with the disks (vmdk), .vmx file, nvram, .log files etc.).
    Copy that entire machine to a drive (a folder on the management station or other attached/network available storage)

    Connect to the new host via the management console.
    Open the Datastore where you wish to place your new machine(s)
    Upload (import) the entire folder - containing the Virtual Machine, you previously copied/downloaded.
    Then open the that new folder and right-click on the .vmx file and select 'Add to Inventory'.
    It will then show up in the list of machines in your selected Server/Cluster. Then power off all the old machines and shut down that Host.

    When you power on the machines on the new Host you will be walked through a process that will ask you if the machine was copied or cloned. Since you are moving the VM choose that -  move and NOT clone or it will generate a new machine ID/SID and jack up the VMs usability.

    Do that for any and all that you moved and test connectivity from workstations.

    I’ve done this with virtualized Domain Controllers, SQL servers and even an Exchange server!

    That’s it.

    Peace out.

    Tuesday, December 18, 2012

    Install/Downgrade to Windows 7 from Windows 8 – HP laptop adventures

    I've been without a good working portable/laptop computer for some time (had a couple liberated and another fail) and decided the time was nigh to purchase a very good one for my needs.

    I did loads of research on specs and ratings etc. of course, that's part of what I've been doing for a few decades. So I might have a pretty good idea of what I want and need.
    For me I am primarily concerned with a system that can match or exceed the computing abilities of my workstation. That means a fast 64bit multi-core processor with Hyper Virtualization Technology built in - an i7, loads of fast RAM, a large fast HDD, dedicated video card and ample ports for devices and connections.

    I found some good Dell's, Asus', and HPs. I am a huge fan of Amazon, New Egg and Costco and looked extensively on their sites too. I finally settled on an HP that Costco had for sale with bang up specs and a great price. In fact the price was way better than I could get configuring the device on HPs site or a comparable one on Dell's site.

    This, and most new systems; desktops and laptops now come with Windows 8 pre-installed. Windows 8 is a nice operating system and brings some nice 'under the hood' improvements in security and performance. AND it's User Interface (UI) is very easy to navigate for those not that familiar with a Windows Operating system. All the 'simple things' - web, email, social media, games etc., are quickly accessed and controlled on the Metro 'front page'. For those that are very familiar with older versions however it will definitely take some getting used to.

    HOWEVER, I'm an IT guy. I use dozens of applications on a regular basis, usually daily. AND there are many network/system management applications that will not run on Windows 8 (yet, or ever). So I needed to be sure that whatever hardware I got that I would be able to downgrade/install Windows 7 Enterprise.

    I made several calls to HP over the past couple months speaking with sales and tech people alike. I was finally assured by a level III tech manager that I would be able to install Windows 7 onto my machine with out 'much' difficulty. That the Windows 8 (and maybe some of the Windows 7 drivers from the just previous models) would/should work.

    So I broke down and ordered a new laptop over a month ago. WELL… I finally got it. It had to be made in China exported to the U.S.A., clear customs in Alaska and finally make it to me.

    That's when things got even more fun. <sarcasm>

    You see, most newer systems are now shipping with UEFI type of ‘bios’. UEFI allows for some great flexibility in hardware and configuration that wasn’t possible with the old style of BIOS. Here’s Microsoft’s take on it:

    In addition to better interoperability, UEFI firmware provides several technical advantages:

    • Compatibility with operating systems that support only BIOS
    • Ability to boot from large disks
    • CPU-independent architecture
    • CPU-independent drivers
    • Flexible pre-OS environment
    • Modular design
    Two of the most notable Windows features for UEFI systems are the following:
    • Multicast deployment, which enables large scale network-based image deployment in manufacturing and enterprise settings.
    • Fast boot and resume from hibernation, which improves user experience.
    The rich UEFI interface provides ample room for innovation in the development of operating system features. Along with the other members of the Unified EFI Forum, Microsoft is investigating the following:
    • Rootkit prevention (theoretically)
    • Network authentication at the ‘BIOS/FIRMWARE’ level

    But many Operating systems will now work – at all with this firmware. AND.. This also allows the manufacture to possibly ‘secure’ – read LOCK, the ability to install ANY drivers or Operating Systems that are not ‘properly signed’ or specifically ‘allowed’ by said manufacturer. Sounds great for ‘security’ but that fails when you wish to work on/configure your own hardware! [Wow sounds like an Apple product huh!] Thank goodness I was able to enter the System Setup/Bios (unlock/disable secure mode) and enable ‘legacy bios support. But then came some other issues…

    HP is now throwing the PC enthusiasts under the bus. Computerworld  has said that they have again changed their support for 'downgrading' Operating System - specifically Window 8 down to Windows 7. What a bunch of crap! Users in the past always could downgrade, assuming they had the appropriate licenses -- Windows 8 Pro -- and media for Windows 7 Professional or Vista Business. The question was whether their machines would work after a downgrade. "The company retained its warning that if customers downgraded to Windows 7 and reached out to HP for support, they may have to restore the original Windows 8 OS to get help from the company." Oh well, I've got a solution for that I’ll get to later.
    Well I’ve already got my system so I might as well give it a go!

    My solution was two fold. First I removed the original HDD before I even powered up the laptop and just put it aside in case I had to send the whole thing back as it was when I received it. I could just reset the BIOS to default, install my original Hard Disk and bam, just like new. Yes I know most wouldn’t go through this much trouble, and that is OK. You can just skip this part and wipe the drive that came with the system and move on from there. But me, I’m a tad extra careful and conservative and always make sure I have a complete ‘escape’ plan. I purchased a brand new Hard Disk Drive. I Picked up a 1 terabyte (1TB) 7200RPM HGST/Western Digital drive from Fry’s for just under $100. Being a Western Digital I know that the HP HDD drivers should work with it. And this drive was faster than what came stock – 7200 RPM vs. 5400RPM!

    Second part of my plan was the actual installation of Window 7 (Enterprise in my case) to the laptop.

    Some pre-requisites: Make sure you have a Windows 7-64 bit WITH SP1 install DVD. You can only use a 64 bit version of Windows AND it must have SP1 already incorporated (sometimes called ‘slipstreamed’) or you will not be able to install this on UEFI hardware. Also go to the manufacture’s web site and download ALL the Windows 8 64bit drivers for you model of system (for me it was HPs DV6t-7200) AND see if you can find the Windows 7 64 bit drivers for the model ‘just preceding’ the Windows 8 model you have – for me that was the DV6t-7000. After you’ve downloaded all the drivers extract each one to its own folder. If you use 7-zip (which you already should be) you can just right-click on the drivers self-extracting  ‘.exe’ file and then choose 7-Zip option to ‘Extract to “\drivername” folder\’ . Then copy all these to a DVD or USB drive you’ll need them once you get Windows booted to the point that you are booted to the desktop. Probably the most important ones are the Network Adapter drivers. You will certainly need to get online quickly to ‘Activate’ your Windows installation, Update you Windows installation and hopefully update your drivers automatically.

    So now the semi easy part.

    Boot into you bios/setup – usually it’s the ‘Esc’ key and then enter ‘Setup’ or System Setup. On some machines it might be F1, F2 or the like. But you need to get to the BIOS/Firmware options. You may even be prompted to enter a password! Thankfully as of now most manufacturers actually present that password – usually a number, right on the screen; enter it and then you will be in.

    In the setup options use the arrow keys and enter to navigate (as described on the help window at the bottom of the screens.) and make sure you do NOT have ‘Secure Boot’ enabled. Usually you can use the  arrow keys to select this option and then once high-lighted press either F6, F5 or + or – to change the value. It must not be Enabled or you can not install Windows 7.

    Then you have to to change Boot mode to LAGACY in BIOS. (Sometimes it is Legacy mode:Enabled). And in the Legacy section of the bios boot order make sure that the 1st boot device is UEFI DVD drive. Then Save Changes and exit.

    The system will reboot. And hopefully if you’ve enabled legacy boot mode, made sure that the 1st boot device is UEFI DVD drive (And of course put your Windows 7 64SP1 installation DVD in the drive!), you should be able to install Windows 7!

    Yay!! Then comes another fun part. After Windows is installed you will surely have to install a whole load for drivers. Open Device Manager (see all the yellow exclamation marks!), right-click on the devices and choose update driver. Then put in your DVD with all your drivers you made earlier and start finding the updated drivers.

    OK, so that is a short version of an even longer winded version I originally had written about this project. I’ll be adding more articles as I can. Some will be how to dual boot Window 7 and Windows 8 - on separate partitions, how to decide I you can/should upgrade to Windows 8 and how to properly do it. I’ll also, from time to time put up more tips on navigating through Windows 8.

    Hope this helps some. Peace out.

    Sunday, December 16, 2012

    Moving Outlook files and Settings to New computer and error (0x8004010F) : 'Outlook data file cannot be accessed

    So after setting up new PC I've been going through some things that might help some others.

    I needed to transfer my Outlook profile to my new machine. AND I didn't want to have to create all my connection settings over again. Yes I know I could just copy over my .pst file over to the new machine and then re-create all my accounts and point them to that .pst file. But I have a lot of accounts with unusual configurations (on the advanced connections tab) and I didn't want to hassle with that for each and everyone of my accounts. [ I have 5 POP3 Gmail accounts I keep separated for various reasons and another 6 personal domain accounts]
    So to move my Outlook file and settings I did the 'usual'.

    First, obviously, I installed MS Office (2010) on the new PC. [BUT do not launch the program yet!] I then copied over my Current Outlook folder Located here:

    Win 7 and Win Vista  (drive):\Users\user\AppData\Local\Microsoft\Outlook 

    Windows XP (drive):\Documents and Settings\user\Local Settings\Application Data\Microsoft\Outlook

    to a ‘temporary’ folder on the new PC.

    I will then copy that folder to the new proper location after I import the Profile settings, as described below. First I exported the old settings and them copied them over to the new machine and imported them.

    To export the profile settings (registry) from my original machine:
    In Microsoft Outlook you can easily export some types of information to a file. However, there is no option to export your profile e.g. when you want to have the same settings on another computer and you do not want to manually put all of them together with the account details again. In order to do so, you can use the Windows Registry Editor that gives access to all the information.

  • Click Start
  • In the search field type Regedit and hit Enter
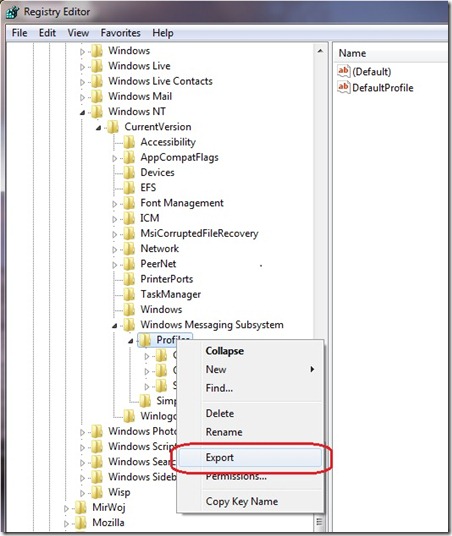
  • Expand the following registry entry: HKEY_CURRENT_USER\Software\Microsoft\Windows NT\CurrentVersion\Windows Messaging Subsystem\Profiles.
  • You will see a list of your profiles.
  • Right click on the profile that you want to copy and click Export

    321

    1. Then, you can specify the name of the registry file and the location to save it e.g. Desktop.
    2. Now, you need to copy the file to another computer and double click it there and choose to ‘add the information to registry’
    3. Confirm that you want to make changes to the registry.
    4. Now launch Outlook on the new machine and you will most likely get an error saying the .pst file was not found. NO big deal yet. OK/Close your way through the next few windows to EXIT the application. Here we’re only trying to create the default folder/location.
    5. Now copy the contents of the old Outlook folder from where every you had it temporarily to the new Outlook location. (path should be close to the same as above.)
    6. Now run your Outlook, the new profile will be opened (if you have only one) or you will be prompted to choose one of profiles (if you have more than one). And it ‘should’ work. At the minimum you should see all of your old mail, folders, contacts and calendars.

    However I had some errors. Specifically:

    Receiving reported error (0x8004010F) : 'Outlook data file cannot be accessed.'
    Sending reported error (0x8004010F) : 'Outlook data file cannot be accessed.'

    Arghh. So here is the fix that worked for me. Seems that the ‘Folder Location’ for the deliver of email was not properly ‘pathed’. Here is how to fix that.

    Changing the folder to specify inbox fixed the issue. Apparently the inbox did not get set and the higher level file name was selected.

    1. From Outlook 2010 click File>Account Settings>Account Settings (if you have more that one account you will have to do this for each one – just highlight/select them)

    image

    2. Click Change Folder (Down on the lower left corner)

    2

    3. Click the + to the left of the folder name to expand the subfolders. Click on ‘New Folder’ and create a new ‘temp’ folder; call it 01 or what ever, and select it. Click OK then you should now see a Folder location in the 'Change Folder button on the lower left.

    4. Now let’s go back Click on Change Folder and now Select the 'Inbox' instead of that ‘01’ folder and click OK. The change should now 'stick' for you. Click Inbox.
    Click OK.

    image

    image

    5. Close Account Settings and click send/receive. And you should be good to go.

    It’s an obvious bug that the settings won’t ‘stick’. But this works!

    Hope that helps some. I’m sure I’ll be referring back to it.

  • Sunday, October 21, 2012

    iDevice updates and backups 04

    I've written previously about backing up and restoring your iDevice.   I'd like to add a short update to that. Having recently dealt with a few people who have 'lost' their data (either just photos or all their settings) after updating to iOS 6. I thought I should re-iterate a few things.

    First use iTunes to backup your device (including 'synching purchases) and make SURE you back up to your computer (and then iCloud if you choose) regularly; I'd recommend at least once a week. Read my previous post on how to use Apple’s iTunes method for that.

    Second. As I mentioned before, I HIGHLY recommend using a third party application to copy off all your data; photos, contacts, phone logs, messages etc..

    My choice to do that is DiskAid. With this application you can copy off all your data AND remove/delete older data such as photos taking up space. You can also copy all your contacts off (they are exported to a vCard format) that will then let import them into other applications like Outlook or other contact management software! I am always amazed that people will spend hundreds of dollars on a device and not spend any money on backing that data up. Folks most of you will spend more on dinner for two that the cost of this application.

    I just got done freeing up 4GB of data on a iDevice that would not update because of 'not enough available space'. There were hundreds if not thousands of pictures on it. To selectively delete them individually would have taken a very long time. Using DiskAid we just copied the entire Camera Roll off to the PC and removed all of them from the device. By default this user has their pictures already uploading to Instagram too.

    After freeing up that space we were successfully able to upgrade to the latest version of iOS. BAM dead simple. And now those pictures and files can be backed up from the computer to an external drive for REAL backup and peace of mind.

    Have fun. Peace out.

    Friday, August 31, 2012

    Security Update release for Java

    Looks like Oracle has quickly released a patch to the serious Java security whole. But it also looks like they 'poorly packaged' it. So it may not install correctly on all Operating Systems.
    First, verify you have the latest version of Java installed; go here.

    If not, then get the latest version here.

    The Linux and OS X versions seem to install without error. But… 
    For Windows users you may get an error "Error 1714. The older version of Java cannot be removed..."
    This can be fixed by first 'trying' to uninstall all the Java applications you find.

    Go to Control Panel>Programs and Features>Java.. then pressing uninstall for each Java application listed.

    If that fails (and it has for me on two Windows systems) Grab Microsoft's Uninstall Utility here, run it and choose 'having problems uninstalling..' and let it do it's thing. You'll be presented with a window showing what applications you wish to remove; choose Java 7 or what ever was giving the error.
    Then after finished again try to install the latest Java again (the one you downloaded previously. (source)

    Be safe out here. Peace

    Thursday, August 9, 2012

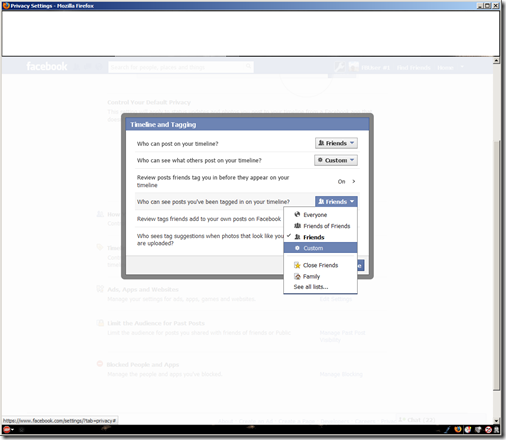
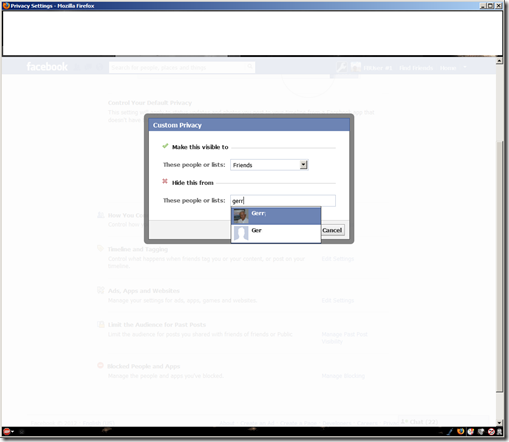
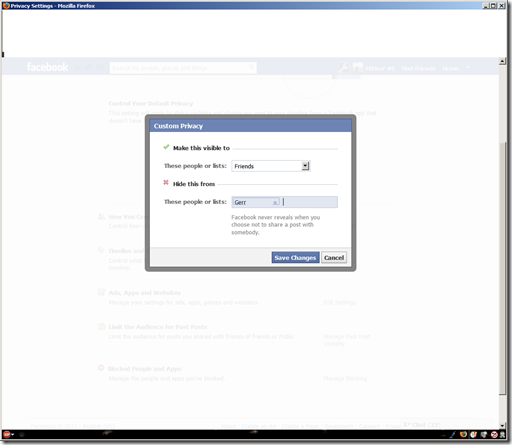
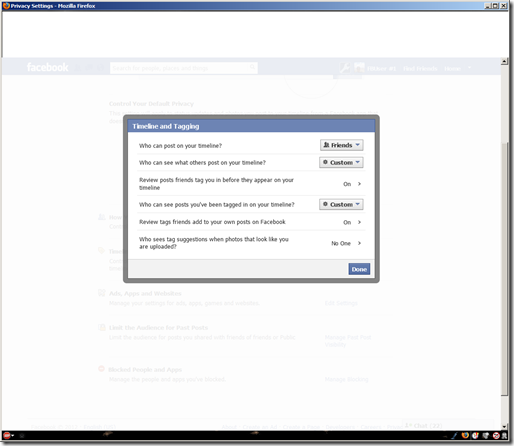
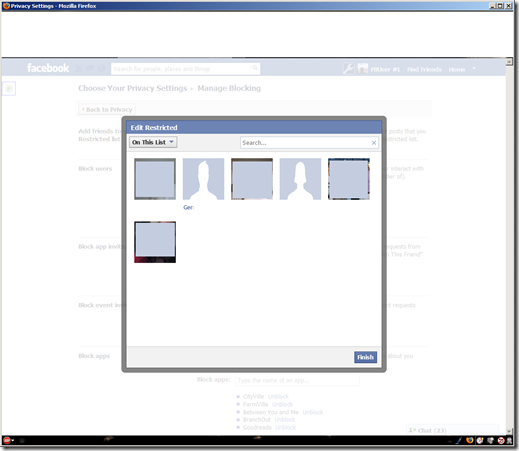
    How to Block Your Wall on Facebook From a Friend, Friend of Friend or everyone. And How to Block a Wall Post on Facebook

    So far these are the simplest instructions I've come up with for How to Block Your Wall on Facebook From a Friend, Friend of Friend or everyone. And How to Block a Wall Post on Facebook

    1 Click "Account" at the top right of your profile screen.

    2 Click "Privacy Settings." Click the "Custom" button and then click "Customize settings."

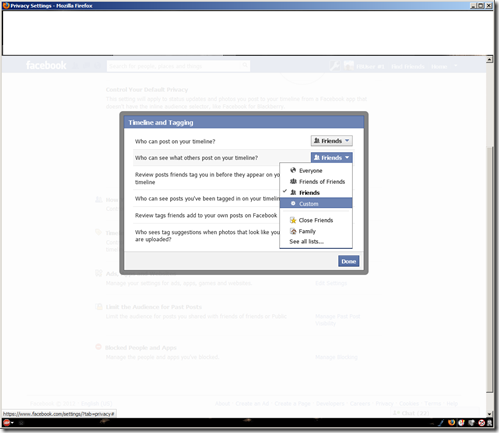
    3 Click the current privacy settings next to "Posts by me." Your current privacy setting is either "Everyone," "Friends of friends" or "Friends only." Click "Customize."

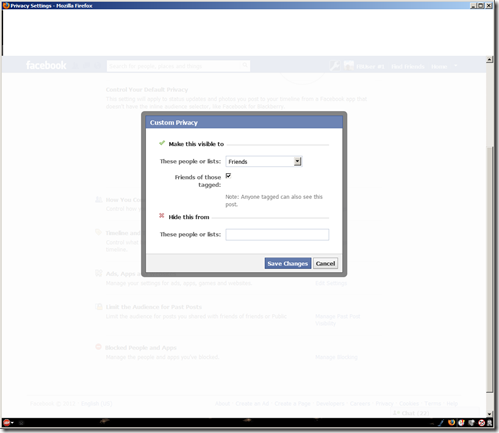
    4 Type the name of the person you wish to block from setting your wall in the "These people" text box under "Hide from." Click "Save Setting."

    Then Check this too

    1 Log into Facebook and click "Edit My Profile" at the upper left.

    2 Click the "Privacy Preferences" link in the left column.

    3 Select the "Edit Settings" link from the "How You Connect" area.

    4 Select the gray menu box positioned to the right of "Who Can See Wall Posts." A menu appears.

    5 Click "Custom."

    6 Click the "These People" text field in the Hide This From section.

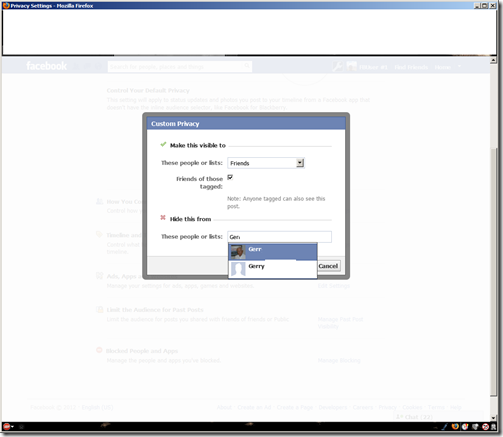
    7 Type the name of the person you want to block from posting on your wall. Names appear below the These People field while you type.

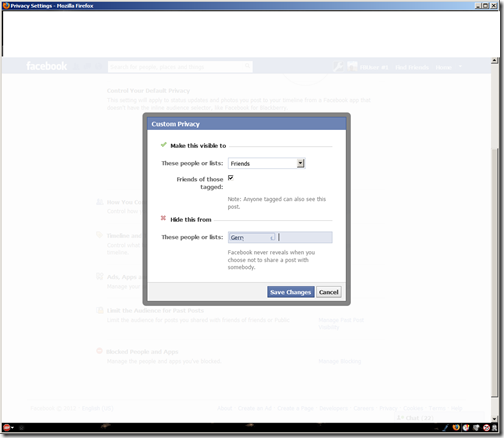
    8 Click the person's name. His name appears in the "These People" field. Repeat Steps 7-8 to add more people.

    9 Select "Save Changes."

    In your PRIVACY SETTINGS, if you want to change how your wall appears to others you need to go to TIMELINE & TAGGING and change your settings there. I have this feeling that most of you are going to CONTROL YOUR DEFAULT PRIVACY and making your changes there. Control your default privacy only changes your future post, until you change it again. So, if you make sure that you set those first (TIMELINE & TAGGING). Keep in mind this does not change settings for your posts, not photo Album.

    Here's another little secret. On your wall underneath your wall banner is ACTIVITY LOG and right next to it is a GEAR icon. If you click that icon, select VIEW AS. A search bar will appear on the top left corner of your page . Select a name of one of your friend and it will show you exactly how your page appears to that friends and if you read the description you'll notice the word PUBLIC in blue and it will show you how the page appears to the public. This is how you can view your settings! [if you do this make sure you clear your internet cache settings first!] :-)

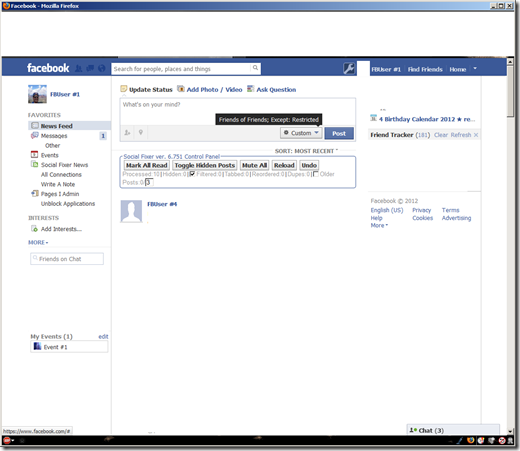
    I’d also like to put in another recommendation for the use of ‘Social Fixer’ a Browser Plugin to dramatically improve your ability to control the layout and functionality of Facebook.

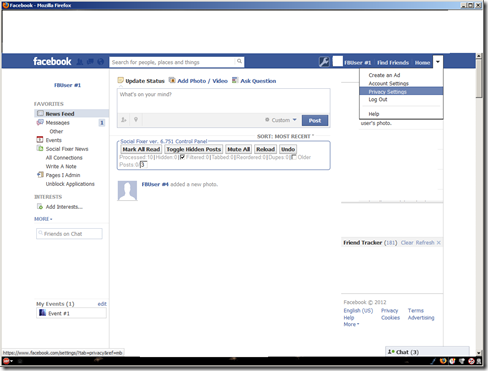
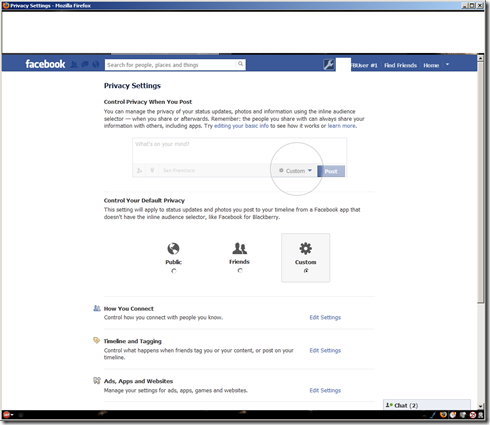
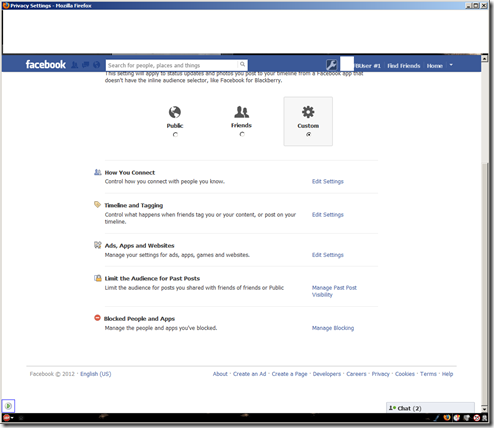
    Below are some screen captures of the above procedures for you if you care.

    Hope this helps some who’ve been asking me.

    123456789101112

    For your future post make sure your settings are defined correctly as you do them.

    13

    Saturday, June 23, 2012

    Android ICS on Epic 4G Touch (Sprint’s Galaxy SII)

    Here, I am going to show how to Root you Epic 4G Touch phone with the latest leaked Android build (FF18) and add a custom recovery kernel called Clockwork Mod – CWM. Please read this entire long winded but detailed post before you even begin downloading anything to make sure you have a grasp on the whole processes. [This is primarily for a few family members and close friends who’ve asked me but I figured more of you might be interested so here it is.]

    Before we begin you should probably do this if you haven't already; register for an account (free) on the XDA-Developers site. This site is the go to site for everything in phone development and tweaking. I originally used this site to hack my Treo phones, then Windows Mobile and now Android devices. This post contains information directly from XDA’s site. ALL credit to any and everything here should go to the developers and contributors there! I just tried to tie this into one location for one specific purpose for those that asked.

    Also I’m providing this tutorial for ONE specific Android phone – the Epic 4G Touch (Sprint USA’s iteration of the Samsung Galaxy S2 device). Virtually every phone is different; even the ‘same phone’ but on different carriers are different. For example the Samsung Galaxy S2 on AT&T is different than the Samsung Galaxy S2 on Sprint and T-Mobile. So using the wrong firmware/software and rooting/tweaking methods – those not specifically for your phone make, model and carrier can/will turn you nice new expensive device into a really neat shiny and expensive paper weight.

    The video that they now include for sign up should definitely be watched! :)

    Although the information I provide here is detailed and accurate you still have the slight possibility of ‘bricking’ your device – paperweight reference again ;) I provide no guarantees or warranties as to how this will work for you.

    If you're on a Gingerbread version of Android - 2.3.x (EL29 most likely) you can easily 'jump' ahead and flash your phone to ICS 4.0.x with the ‘One-Click’ method.

    If you've read my previous articles on rooting you probably already have root access and have hopefully installed Titanium backup.

    You can use Titanium to do a full backup of your applications (and settings too but we won't use system apps or settings for a restore to the new version; just applications)And before you begin I recommend using Titanium to back up your applications.

    If you don't have root you can do the following, just in case something goes awry and we need to do a ‘full RESET data wipe. Doing the ‘Preserve Data’ upgrade you should not have need for any of this. But I’m a stickler for backups:

    Install App List Backup from Market, run it and save a list of all your apps. This saves the list of installed apps so you can re-download them from the Market later. This way, your apps still show up in downloads (My Apps in Google Play/Martket) and receive updates.

    Install SMS Backup and Restore from Market, run it and backup your SMS history.

    Install Call Logs Backup and Restore from Market, run it and backup your call log history. [Note that Google does this and you may not want or need this]

    The ONLY change was the addition of ROOT to the ROM. This will NOT trigger the Yellow Triangle NOR will it increment the ODIN flash count. This does NOT have the issue with the USB jig being disabled. [I have condensed this guide from sfhub on XDA from these posts here and here.]

    what is a build number and what does it mean? The build number tells you when it was released.

    Example:

    EG30 (Gingerbread 2.3.4) Was released/shipped 07-30-2011

    EL13 (Gingerbread 2.3.6) released 12-13-2011/ EL29 (Gingerbread 2.3.6) released 12-29-2011

    [E=year – 2011 L=month – December and 13=Date]

    So Build FF18 is an Ice Cream Sandwich build of Android - 4.0.4. Built June 18, 2012]

    1) Prerequisites Checklist
    Phone charged above 70%. Uninstall or disable ANY Android Antivirus software you may have (add it back later if you want)

    Good USB cable

    Get 7-zip and install it on your PC  (right-click and install as Administrator)

    Samsung [USB/Android drivers] are INSTALLED
    Phone is connected to USB port and recognized.

    Please DISABLE any PIN code (LockScreen etc.) you may have created to protect your phone. As a security measure, after the flash, Android will ask you for your PIN, if you have one enabled. It is simpler to have no PIN active.

    2) Download the FF11 full restore One-Click self-extractor

    a. SPH-D710.FF18_CL663858_ROOTED_NODATA-oc-sfx.exe (This version ‘PRESERVES’ user data) There is also a ‘RESET’ user data/full wipe version available at the xda post by sfhub.)

    b. [MD5: 14ac16b15ef819af73b997a718134aea / Size: 310,594,612]

    3) Extract the package
    double-click on the self-extractor file, specify the directory to extract to (instructions assume C:\)

    4) 4) Start ODIN One-Click
    Navigate to C:\Odin-OC
    NoData: Double-click on SPH-D710.FF18_CL663858_ROOTED_NODATA-OneClick.exe
    Note #1: On Windows &, you MUST right-click on the file and Run as Administrator.

    5) Place phone in ODIN download mode

    Make sure your phone is NOT connect to PC yet

    Power down phone completely

    Wait for capacitative button lights to turn off

    Simultaneously Press and Hold [Power] [VolDn] until confirmation screen appears

    Then Press [VolUp] to enter Download mode

    NOW

    Connect USB cable to PC if not already connected

    image

    ODIN should show yellow COM port in 2nd column (Doesn’t matter what the COM number is)

    6) Start ODIN flash process
    Press [Start]
    7) Complete - PASS!
    When complete you should see a screen similar to what is shown at top of post
    Phone will automatically reboot
    Status should change to green PASS!
    Boot process will be slightly longer than usual during which time you'll see the 4G logo screen. You will also likely see a screen saying ‘updating android….’

    Next we’ll add CWM (ClockworkMod) by using Option D in the Auto Root Package to install FF11+CWM-agat (you are already rooted so Option A is not necessary)

    1) Prerequisites Checklist

    Make sure that USB Debugging is ENABLED - [Menu->Settings->Applications->Development->USB debugging]
    USB Storage Mode is OFF - [Drag down the notification bar and tap on "USB Connected" - should be off by default – looks like this:

    image

    2) Download the E4GT automated rooting package e4gtauto.zip

    UNZIP to top-level directory of your C: drive
    Note #1: zergrush is a known exploit being used to root your phone. Your Anti-Virus software may quarantine or cause the download to be incomplete. Disable your Anti-Virus software if needed so the download can complete.

    3) Run the E4GT automated rooting package:

    Use Windows file explorer to navigate to C:\e4gtauto and double-click on RUNFIRST.bat and select Option D

    image

    Then Option ‘U’

    image

    Then finish.

    Disconnect your phone, reboot and you will now have a ‘Stock Rooted FF11 based phone WITH a custom recovery (CWM) installed.

    You will now be able to install and run applications that require ‘root access’ such as Titanium Backup; my number one recommended application for any Android device.

    Here is a GREAT video showing you how to use the ‘One-Click install method by sfhub.

    Please note that this video is for an earlier release and so the links are not to be used; use the ones I provided above. But the process is exactly the same!

    Video here

    http://www.youtube.com/watch?v=_IL21F8Gfbs

    And here is another video by Qbking77 on how to install CWM (as described above).

    (Again note that the version demonstrated here is old but the process is the same.)

    Video here

    http://www.youtube.com/watch?v=jZRnH-_XZmM

    Also on Ice Cream Sandwich there is a major change in how the device is recognized by windows; a mode called MTP is now the default vs USB which is how most devices are usually seen.

    Read here

    This can confuse and frustrate people. I prefer USB storage mode.

    Fortunately sfhub comes to the rescue with his 'AutoRoot' package (the one above)

    The Auto Root package has a solution for you. Under "Extra Options" of the main menu, there are 2 choices that affect ICS mass storage:

    1) Enable ICS USB Mass Storage Mode

    2) Enable ICS USB MTP Mode

    These are mutually exclusive options. If you enable one, you disable the other.

    To get GB USB Mass Storage behavior, choose the first option (USB Mass Storage Mode). This option once chosen, will be persistent through reboots and is stored in your Android User Data. It will only get reset if you reset your Android User Data or manually choose a different mode.

    Here is a review of the older leaked build (FF02) but it has many of the functions of ICS described. And some of the ‘bugs’ have also been removed.

    Good tutorial of what ClockworkMod (CWM) is here.

    And how to Create and restore a Nandroid (image back up).

    How to Boot to recovery - power off the phone completely.

    Hold the volume up + the power button till you see the first Samsung logo; usually 6 to 7 seconds, and let go.

    You'll now be in recovery/CWM.

    Now for some additional fun and features I added a custom ROM on top of the stock rooted one.

    I like Agat’s ROM. It is lightly themed, has some speed and batter tweaks and over all just works great for me.

    You can get it here:

    http://d-h.st/ktf

    Download and check the MD5 sum to make sure you got the whole thing. Copy it to your SD card.

    Then shutdown you phone.

    Then boot to recovery – Power on button + Volume Up button until you see the first Galaxy SII screen and let go.

    The in the recovery menu choose install zip from SD card. Navigate to that tFF18_v0.1.0.zip file and click on it and choose to install. After the install you can then reboot into the system.

    Some important notes:

    You may have to go to Settings>Language and Inputs>Keyboards and select the Swipe keyboard and check the language settings and if it’s default.

    THEN go into Settings>Applications>All and scroll to Swipe. Hold on it till options come up and clear data. Swipe should then work in all applications.

    Also I always check the MD5 sum of all my downloads to ensure that I have the whole entire file. And when I copy files to my SD card I recheck the sum to make sure the entire file copied and did not get corrupted.

    What is and MD5 Sum? Md5 is a unique cryptographic ‘hash’ used to check and to test for the integrity of your files from any degradation in both their physical and digital copies. If the hash for your file is different than what is supplied to you, the file is damaged / corrupted / tampered with.

    I use this very simple MD5 hash checker to insure that the file(s) I've downloaded are complete and the ones originally posted.

    I use the standalone version in the zip file (extracted to a folder).

    You can of course use the installer version - it includes the User Manual which will probably benefit most!

    MD5 Checker is simple and easy to use. Start MD5 Checker and select the file that you want to check. The chosen file's MD5 hash is automatically generated and displayed. Then obtain the published MD5 hash for that program (from the trusted source). Copy the published MD5 hash on to the Clipboard and click on the MD5 Check button. The published hash is automatically pasted in from the Clipboard and a check made. The result of the check is then displayed.

    Here is a list of my currently installed applications if any of you care.

    Well happy flashing and enjoy. Peace out.

    Saturday, June 9, 2012

    Flash update kills Firefox causing hanging and crashing

    Starting with the latest Adobe Flash version, some browsers, particularly Firefox, will hang or crash.

    After the last Adobe Flash update my Firefox Browser became completely unusable. Chrome and Internet Explorer (IE) still worked but they too were markedly slower.

    I am a huge fan of Firefox and use it as my primary browser because it enables me to use a plethora of extensions that greatly increase my productivity and the usefulness of the pages and sites I visit. [I'll list my plug-ins at the end]

    To get Firefox to even work at all I had to started it in Safe Mode -
    in the ‘Run’ dialog type "Firefox -safe-mode" (minus quotes) - Then choose to continue in safe mode. Then go to 'Tools>Add-ons>Plug-ins and then disable Shockwave Flash. That would then allow Firefox to work but obviously that is not a solution.  Without Flash you can hardly view some websites and of course could not watch most videos or multi-media files.

    So I set off on a solution like an angry rhino.

    I tried uninstalling Adobe Flash (using Windows Uninstall AND Adobe's own 'Flash Removal Tool) and re-installing it several times; that didn't work.
    You can get the official Adobe Flash 'uninstaller' here. [download/save and then 'run as administrator' to use it.]

    For all of Adobe's Flash Player downloads (the FULL Offline installers) you can go here
    Make sure you download all the players you will need - if on Windows download the one for Internet Explorer AND the 'Plugin-based browsers' versions.

    I tried using older versions of Firefox; that didn't work.
    Re-installed the latest version of Firefox, with Flash Player 11.3.300.257, 
    I tried the latest Beta/Developer versions of Firefox ; that didn't work.
    I tried reverting to older versions of Flash; that too didn't work.

    I finally found the reason for this behavior AND a solution after MUCH searching and LOADS of aggravation.

    According to Adobe, "Starting with Flash Player 11.3, a protected mode was added as a new security enhancement for Firefox 4.0 and greater on Windows Vista and higher.  This security enhancement is designed to limit the impact of attacks launched from malicious Flash content (SWF files)."

    They are trying to 'sandbox' Flash files to limit their susceptibility to being used as vectors for more serious virus/Trojan attacks.
    Problem is I believe their developers FAILED. While the idea of sandboxing is sound (Chrome and the latest IE browsers use it extensively) this implementation is obviously poorly written and implemented in Flash for Firefox.
    You would think that Adobe, with it's truckloads of cash, could hire decent security coders and engineers and then thoroughly test their software. But judging by that fact that Adobe's products have been the primary vector for serious security wholes over the last 7 years I guess not. But I digress.

    Ok so now to the solution
    To disable this newer 'protected mode':
    add the following line to your 'mms.cfg' file located in:

    On Windows 32bit: C:\windows\system32\macromed\flash
    Or
    On Windows 64bit: C:\windows\syswow64\macromed\flash

    "ProtectedMode = 0"  (without the quotes)

    If the mms.cfg file does not exist, create one using any standard text editor (e.g.. notepad).

    Make sure if you create the file that the file 'extension - is NOT a .txt but is the .cfg.
    If you don't see or know how to see the file name extensions you can read how to do that here. Depending on your operating system, you might need to first create and or save the mms.cfg file to a writable location (such as your documents or desktop folder) and then copy the file into the destination folder using Windows Explorer.

    Here is a link to a zipped mms.cfg file version with Protected Mode disabled (directly from Adobe).

    Download, unzip the file and copy it to the needed location.
    One note:
    I did not find the mms.cfg file in my "C:\windows\system32\macromed\flash" so I copied that file to there.

    I did however also find an mms.cfg file in my "C:\windows\syswow64\macromed\flash" directory.

    There I simply opened the mms.cfg file (with notepad) and just added the line ProtectedMode = 0

    below the last line there.

    Then I started Firefox normally. Went to Tools>Add-Ons>Plugins and made sure Shockwave Flash was 'Enabled'

    Now all is working very well. And since I'm using version 14 (beta) of Firefox things are even faster.

    That ends two days of aggravation.
    I hope that helps some of you.

    For those that care here are the Firefox Extensions/Add-ons I use:

    Adblock Plus
    http://adblockplus.org/en/

    After the Deadline
    http://atdfirefox.wordpress.com/

    Better Gmail 2
    https://addons.mozilla.org/en-US/firefox/addon/better-gmail-2/?src=userprofile

    Video Download Helper
    https://addons.mozilla.org/en-US/firefox/addon/video-downloadhelper/

    Downloads Context Menu
    http://www.bm-productions.tk/

    https://addons.mozilla.org/firefox/downloads/file/128500/downloads_context_menu-1.5-fx-windows.xpi

    Ghostery
    http://www.ghostery.com/

    Google Redesigned
    http://www.globexdesigns.com/#!products/gr
    https://addons.mozilla.org/firefox/downloads/latest/8434/addon-8434-latest.xpi?src=addondetail

    FireFTP
    http://fireftp.mozdev.org/

    IE Tab V2
    https://addons.mozilla.org/en-US/firefox/addon/ie-tab-2-ff-36/

    PDF Download
    http://www.pdfdownload.org/

    Redirect Remover
    https://addons.mozilla.org/en-US/firefox/downloads/latest/537/addon-537-latest.xpi

    RightToClick
    https://addons.mozilla.org/en-US/firefox/addon/righttoclick/

    Social Fixer for Facebook
    http://socialfixer.com/

    Stop Autoplay
    http://neticat.ath.cx/forum/index.php

    TinEye Reverse Image Search
    https://addons.mozilla.org/en-US/firefox/addon/tineye-reverse-image-search/

    Vacuum Places Improved
    https://addons.mozilla.org/en-US/firefox/addon/vacuum-places-improved/?src=api

    Greasemonkey
    https://addons.mozilla.org/en-US/firefox/addon/greasemonkey/

    Greasemonkey Scripts:
    Search here http://userscripts.org/
    Google Maps Zoom
    http://jeffpalm.com/gzoom/

    YouTube Enhancer
    http://userscripts.org/scripts/show/33042

    Wednesday, June 6, 2012

    Avoid Internet Doomsday: Check for DNSChanger Malware Now

    Some background:
    The DNS system is a network of servers that translates a web address -- such as http://www.google.com -- into the numerical addresses that computers use to locate actual websites, computers and servers. It is known as the Internet's phone book, which translates URLs to the IP address for the server hosting the Web site. This is not only true for Web sites, but also for any other Internet-based service being used, including servers for e-mail, backups, synchronization, chat programs, and calendars AND antivirus programs to update themselves.

    Back in November, law enforcement authorities working with the Federal Bureau of Investigation arrested six of the seven individuals in Estonia responsible for infecting millions of Windows and Mac machines worldwide with the DNSChanger Trojan. As part of the "Operation Ghost Click" raid, FBI agents also seized over 100 servers at data centers throughout the United States masquerading as legitimate DNS servers.

    If the FBI were to simply shut down the DNS network, then the millions of computers that had been affected by the malware would instantly no longer be able to access the Internet, and given the scope of this malware infection, would suddenly cut off many and very likely have a notable negative impact globally. Being infected with the malware, these systems would not benefit from users checking for and changing their DNS settings, since the malware would continually revert it and thereby continually disrupt communications.

    To prevent this, the FBI instead chose to keep the rogue DNS servers active and convert it to a legitimate DNS system for infected computers. Since November 2011, there has been a campaign by the government, security agencies and MANY high profile internet service providers (ISPs) to notify users of the DNSChanger malware and offer services to help users identify systems that are infected.

    Most victims don't even know their computers have been infected, although the malicious software probably has slowed their web surfing and disabled their antivirus software, making their machines more vulnerable to other problems.

    To quickly and easily see if this may affect you and what you can do about it visit this site

    Click on the link in the middle of the page and you will be notified if you are currently infected.

    If you are infected/compromised you can visit this page for resolution tips and instructions.

    Remember this trojan/virus will affect PC's AND Macs. Better safe than sorry. Or you could always call me for a hou$e call when your system won't connect to the internet.

    You can read the FBI's page here.

    Google has one here

    Facebook also has one here.

    Sunday, May 6, 2012

    Android App List Backup

    Here is a very good app to use to install/re-install applications from phone to phone. It’s called appropriately enough, App List Backup.
    It saves a list of your installed applications (Market/Play only. It does not list ‘Non-Market’ applications!) so you can re-download them from the Playstore/Market later (on the same or another device). This way apps will show up in Downloads(PlayStore) and receive updates.

    The idea is NOT to physically back up your applications and their settings or to save you from re-downloading apps. For that I use Titanium Backup Pro (root required for Titanium; read my articles on rooting for more information).

    This application creates a list that just let's you VERY easily re-download one or all of your applications.
    Great for sharing links of your applications with others. Or duplicating your installed applications on a new phone or one that is 'reset'; either by wiping or installing new or different ROM version.

    Simply download and install the application from the Playstore. Then run it to create a back up list.
    OR
    Once installed navigate to a list you’ve created and copied over or that someone has given/sent you, and then restore. You can choose which to 'reload/restore' individually if you wish too. Now your applications will  show up in the Playstore on your phone and you can then install/update them.
    Bam dead simple.

    Have fun and be safe. Peace